skip to main |
skip to sidebar
DIY: Insulate Your Cookware
I'm sure there are those of you out there that enjoy cold weather camping as much as we do here at The Trail Collective. And while you're out there braving the elements, the last thing you want is for your meal to get cold before you finish eating it. In an effort to cut the ounces, cookware is being produced from thinner and more "exotic" metals. While this also lends to faster heat transfer (conduction, convection, and radiation) and quicker boiling times, it also means heat can leave just as quickly. This nifty trick will help contain, as well as radiate the escaping heat back into your cookware so you can enjoy that hot cup a' Joe a little while longer...
I've put together some steps to construct a simple, yet effective insulating "koozie" for your cookware. I'm using my all-purpose cooker, the SnowPeak TREK 700 Ti, for this particular example. The basic principle is straight forward allowing you to adapt to whatever cookware you favor. And finally, I think it goes without saying, but this device is to be used after the cookware has been removed from the heat source.
Materials:
- Corrugated Cardboard (Thicker = greater insulating factor = greater size and weight = less malleable. Choose accordingly)
- Duct/Packing Tape (I used clear packing tape)
- Foil Tape ( I used a 2mil general purpose aluminum foil tape. Nashua brand. Can be found at most hardware stores)
So go grab your cookware and let us begin.
I decided to use a thicker cardboard for the base being that the overall height is not as much of a concern as the total diameter. As stated earlier, choosing these materials is purely up to an individual's discretion, while keeping the insulating caveat in mind.
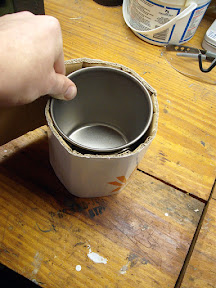
Cut the cardboard to suit in order to make the side walls. Make alterations if necessary in order to accommodate handles or spouts. I chose to slide my cooker in with the handles folded up, therefore I sized the total diameter slightly larger.
Here is were the inside walls are lined with foil tape. The idea behind the tape is to reflect any heat leaving the cookware in the form of infrared radiation. The air pockets in the corrugated cardboard will help reduce the amount of heat escaping to the surrounding air through convection.
Next, use the duct/packing tape to join the two opposite edges. I taped once, vertically, down the seam, and once again around the circumference of the lining at the bottom. (Clear tape was a poor choice on my part for demonstration purposes. Sorry folks.)
Prepare the base in the same manor as the walls by lining with will foil tape. Then trace the circumference of your cookware. I found it better to use the inside of your constructed lining rather than the actual bottom of your vessel. This allows for a more accurate fit. Also remember to always cut larger than your tracing. Its easier to trim away than to redraw/recut over and over.
Fit base piece at bottom and use duct/packing tape to secure in place. I placed several pieces across the bottom of the base and came up the sides.
Finished
Experiment! There's endless ways to accomplish this while following the basic principles. Some designs will be more effective than others. The most you've spent is a few bucks on tape, and recycled some old boxes you had laying around. Happy Trails!


No comments:
Post a Comment